Inspection templates
The Inspection templates page allows you to create and edit Inspection Templates.
When creating the Inspection Template, you need to make basic settings:
|
Attribute/Setting |
Description |
|---|---|
|
Name |
Short understandable description of insprction template |
|
Inspection format |
Regular inspection - single inspection of one object Multi-inspection - Multi-inspection is a special type of inspection for aggregating several related regular inspections into a single structure.
Examples of multi-inspections: area with cars; shopping complex; factory area with many buildings.
More info at MultiInspection
|
| This template can be used only for creation nested inspections inside multi-inspection | Enabling the setting will prohibit the creation of single inspections according to the current template. |
|
Activity |
Mark means that the template is active, it can be used to create inspections, also can be added in Multi-inspection
|
|
Owner-company |
Inspection template company-owner |
|
Integration settings (only for superadmins) |
Admin settings for integration |
|
Description |
Inspection template detailed description |
|
Type of inspection template |
Type of inspection object, affecting template choice screens in mobile App ( menu “What shall we inspect”). |
|
Object naming formula |
Object name is important for inspection lists. The formula may contain only text. You can also refer to the form fields in the formula like this:{group_name:field_name}.
Example: Vehicle {Car:carNumber} Client {Lead:FIO}
|
|
Template naming formula |
Available fields to form the name:
To simplify you can always use {Template} |
|
Zip-archive naming formula |
Similar to Object naming formula |
|
E-mail subject formula for notifications |
Similar to Object naming formula |
|
Message to client on confirm window |
|
|
Checkbox text on confirm window |

|
|
Available to clients |
Users with "Client" role will be able to create inspections themselves using this template. But only under the condition that the template will be linked to the user through one or more access groups. This setting is useful when used simultaneously with Auto-assignable access groups. Auto-assignable access groups, together with avaliable to clients templates, make it possible to configure such a set of templates that are available to new clients after self-registration without additional contact to the company.
Example: download App, inspect your car and get an exact purchase price
More about access groups: Access groups
|
|
Allow the "Inspection is not possible" resolution for inspections |
Allow user to move incomplete inspection to Expertise with the "Inspection is not possible" mark User need to write comment when the inspection ends with "Inspection is not possible" resolution |
|
Allow the "Inspection is not possible" resolution for repeatable processes |
Allow user to refuse of taking pictures of repeatable processes inside an inspections with the "Inspection is not possible" mark. Refers to stages with repetitions, such as: damage, premises in a building, etc. User need to write comment when the inspection ends with "Inspection is not possible" resolution
Warning! Incomplete proccess will not be visible in pdf, zip, integrapi.
|
|
Use exclusive access to inspection during expertise (one expert at a time) |
Allow an expert to use the exclusive inspection lock during expertise. Other experts will not be able to make changes to the inspection until expertise is completed or the lock is removed by the expert (administrator can also remove the lock). The Expert will be notified additionally about the necessity of the Lock if the inspection has started without including it. |
|
Unlock locked inspection if inactive in N minutes |
Automatic remove lock of inspection in the Expertise status if Expert has not shown activity within the specified time. Activity means that the lock will be removed N minutes after the last opening of the inspection page in the browser window. |
| Allow low roles to return an inspection to repeat from expertise |
The setting allows to build interaction between the Client and the Company without additional participation of the Expert.
By "Low Roles" are meant the following:
|
|
Skip the expertise (inspection check) |
If this flag is set, after the inspection is completed, the Expertise status will be skipped and the next status will be set. Results of the steps will not be set. If the setting is enabled, the function to return the inspection to Repeat will be available for all users who have access to the inspection. When the "Request signature of a PDF after a successful expertise" setting is enabled, if the user in clientagreement status makes changes to the document, the inspection will be set to draft status (Inspection is not completed). |
|
Allow one-click approval |
Experts will be able to approve inspection with one common OK- button, instead of approval each foto- and video- step of inspection. Not recommended to use it for responsible inspections! 
|
|
Send to approval from expertise on changes |
If template consists approval sign:
Example: there is one vehicle VIN in the inspection application, and another in the photo. The expert can correct it, but when changing this field, it is clearly necessary to coordinate, because the error may be on the side of your system (the wrong VIN is specified) or still on the side of the user of the mobile application (the wrong vehicle is inspected).
That's why there is a role of "Approving Person” and inspection template and the fields of the template form settings so that such a process could work. |
|
Allow hide hints for experienced user |
When this setting is enabled, an experienced user will see an additional toggle switch "Show sample photos before shooting each step" on the Prepare to Shoot screen in the mobile interface. An experienced user is one who performs the pattern inspection three or more times. By turning off the toggle switch, the user will no longer see hints for inspections only by this scheme. |
|
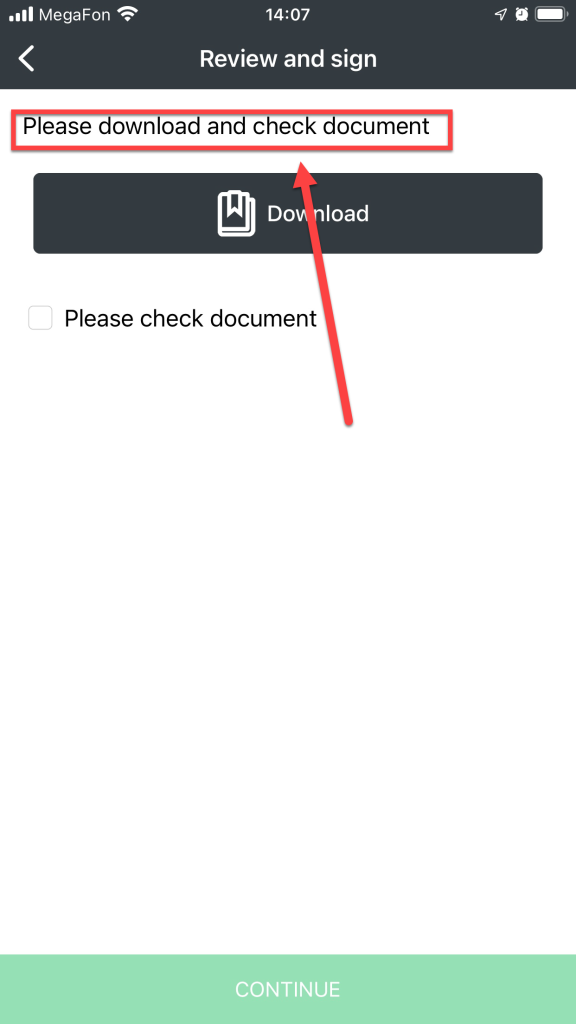
Request signature of a document after succesful expertise |
This setting adds user pdf-file approval via SMS step to business process. Pdf-file is created after the inspection is approved by the user with role of “Expert“ or higher. Green marks the stages appear when you check the box "Go through the stage of results approval with the client":
|
|
Show unsigned PDF in the app before sending to expertise |
The setting allows you to view the PDF document in the mobile app BEFORE sending the inspection to Expertise. |
|
Show unsigned PDF in the app after sending to expertise, but before expertise completed |
The setting allows you to view the PDF document in the mobile app immediately after sending the inspection to Expertise. |
|
Generate a PDF without a signature and show it in the app after successful expertise |
The setting allows you to view a PDF document in the mobile app immediately after a successful Inspection Expertise. |
|
Send PDF without signature to email after successful expertise |
If this flag is set, after signing the inspection by SMS, the users specified in the following setting will receive the signed PDF to the email specified in the profile. |
|
Who receives an unsigned PDF by email |
Selecting users who will receive an unsigned PDF document in the mail. |
|
Show a signed PDF in the app |
With this setting enabled, the PDF document will be visible in the mobile app as soon as it is formed. |
|
Send a signed PDF to email |
With this setting enabled, the signed PDF document will be sent to the specified users' emails immediately after it is signed. |
|
Who receives a signed PDF by email |
Selecting users who will receive a signed PDF document in the mail. |
|
Status dictionary |
The setting allows you to choose a pre-created individual status dictionary instead of the standard one.
More info about Status Dicionaries at Statuses
|
|
The ability to set the coordinate manually |
The setting allows you to specify the roles of users who will be able to manually set the inspection coordinates on the Inspection Expertise page, that means, the specified roles on the Inspection Expertise page will have access to the "Set coordinates manually" button". |
|
Expertise deadline |
The setting allows you to set the automatic setting of the Expertise Deadline that is in the “Expertise” status
|
|
Who can edit the expertise deadline of an inspection |
The setting allows you to specify user roles that will be able to manually set the Expertise Deadline on the Inspection Expertise page |
|
PDF-template |
Gives opportunity to "Group Administrator" and "Administrator” to sel ect pdf-form to be created after inspection.
More info at Users rights matrix / Role model
|
|
Purpose of inspection template |
Settings dependency information in the chart below. |
|
The inspection template can be used to create inspections |
The template can be used to create inspections. |
|
Group admins are allowed to edit inspection template |
The template can be edited by the users with "Group Administrator" role. |
|
Group admins are allowed to copy inspection template |
The template can be copied by the users with "Group Administrator" role. |
|
Who may share an inspection |
Allow certain users to share the inspection. You can restrict by user role (e.g. "Agent or higher" - so the inspection can be shared by an agent or user with a higher role), and by user relation to the inspection (e.g. "Who created the inspection, regardless of user role") |
|
Inspections execution mode |
|
|
Start inspection immediately after creation in the mobile app |
By default, the check mark is not set. |
| Photo resoultion |
The photo resolution setting is applied for steps for which the value is set to "auto". The resolution affects the quality of the image and the final file size. The actual resolution will depend on the available phone formats. You can set resolution individually for each step of the template. For example, you can set a low resolution for entire template, and a high resolution for steps with a VIN number |
| Video resolution |
The video resolution setting is applied for steps for which the value is set to "auto". The resolution affects the video quality and the final file size. The actual resolution will depend on the available phone formats. Be very careful! Not all users will be able to shoot hi-res videos, even if the phone claims a nominal capability. Hi-res videos require an absolutely serviceable phone, a lot of free memory, and a suitable temperature. Otherwise, the user could have technical difficulties due to the fault of the phone. In addition, large files will take a long time to be sent to the server. It is recommended to use a resolution below average. It is suitable for most review tasks and anti-fraud |
|
Phone number for support call fr om an inspection |
Phone number to call the button from the inspection 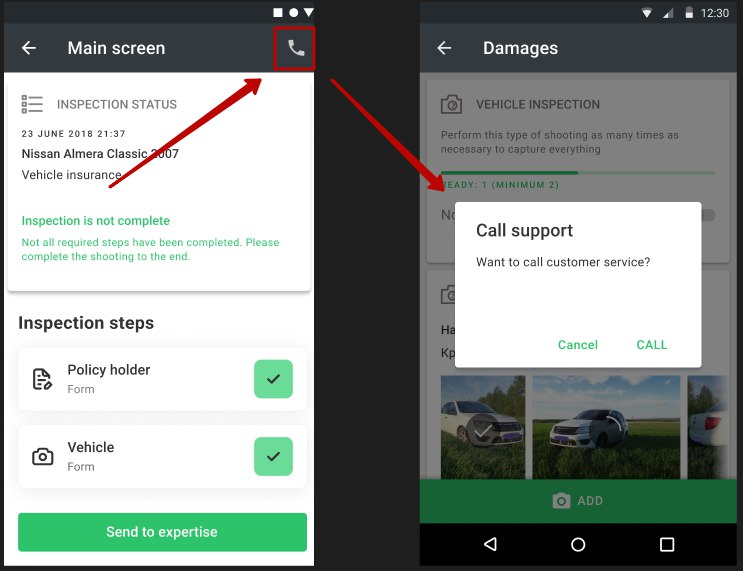
|
|
Title of the support phone |
The text name of the menu item and the call confirmation window 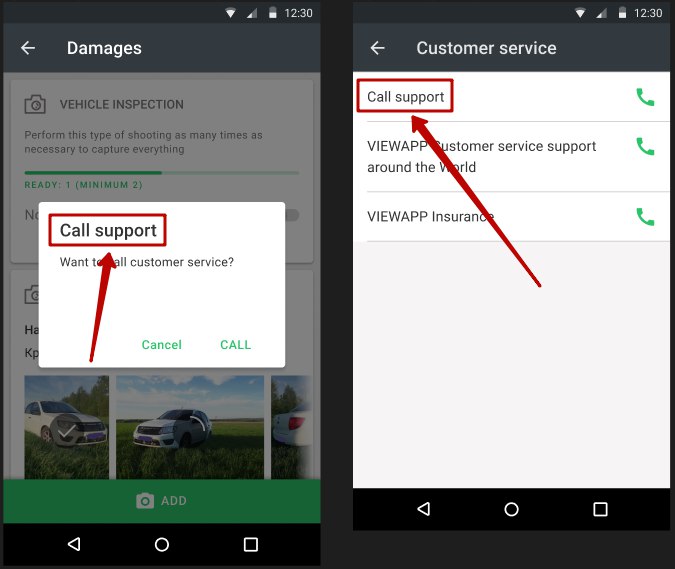
|
|
Call confirmation alert |
Text on the Call Confirmation Request screen 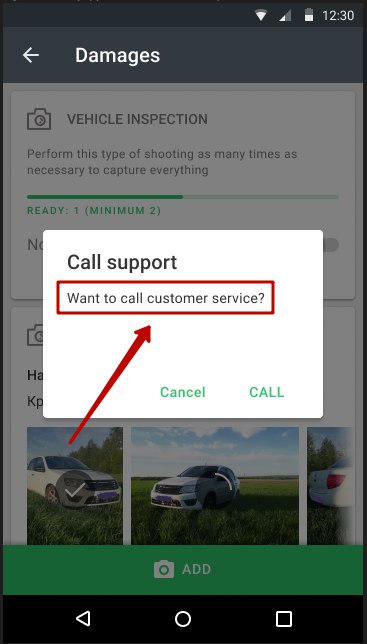
|
|
If you don't specify a Support Phone Number in the Inspection Template, the default Company phone number will be displayed.
More information about the setting on the page Companies
|
|
| Inspection templates available in multi-inspection |
In this section, you need to choose which templates will be available to create inside multi-inspection. 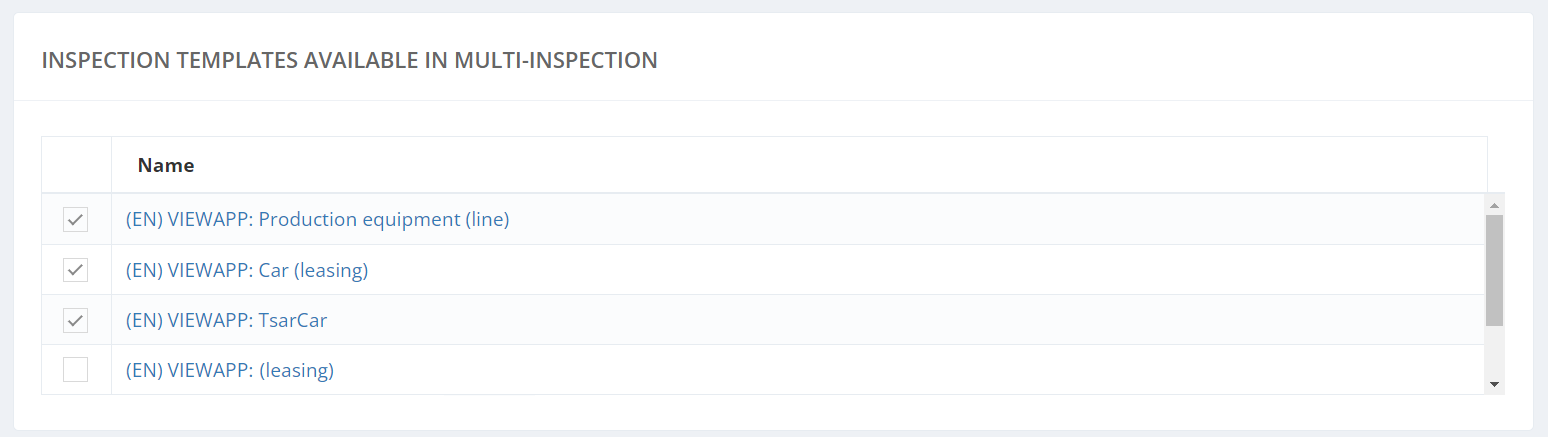
|
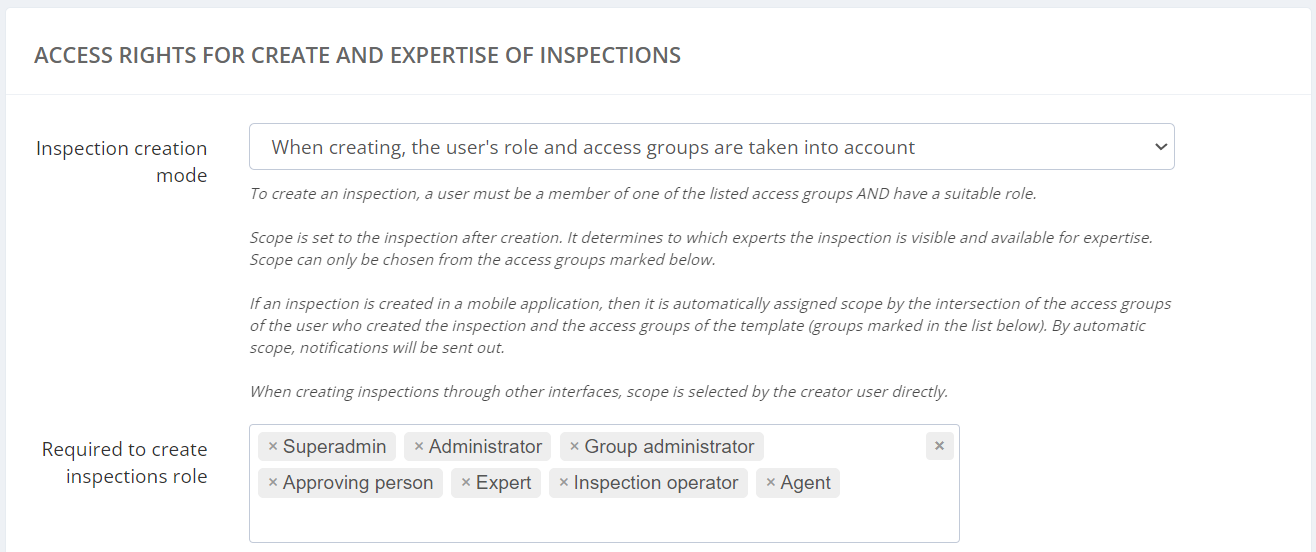
| Access rights for create and expertise of inspections |
Inspection creation mode
Required to create inspections roleYou can select any roles that will be available to create inspections:
|
|
Access groups for inspection creation |
Setting a check mark next to the corresponding access group means that this template will be available to users who are members of this access group. The template can be accessed by multiple access groups. By default, the check mark is not set. 
|
| Access rights to perform inspections |
To perform an inspection, you can configure the rights by Role of the user who can perform the inspection, and you can set "Who can manage inspection performers" directly in the inspection.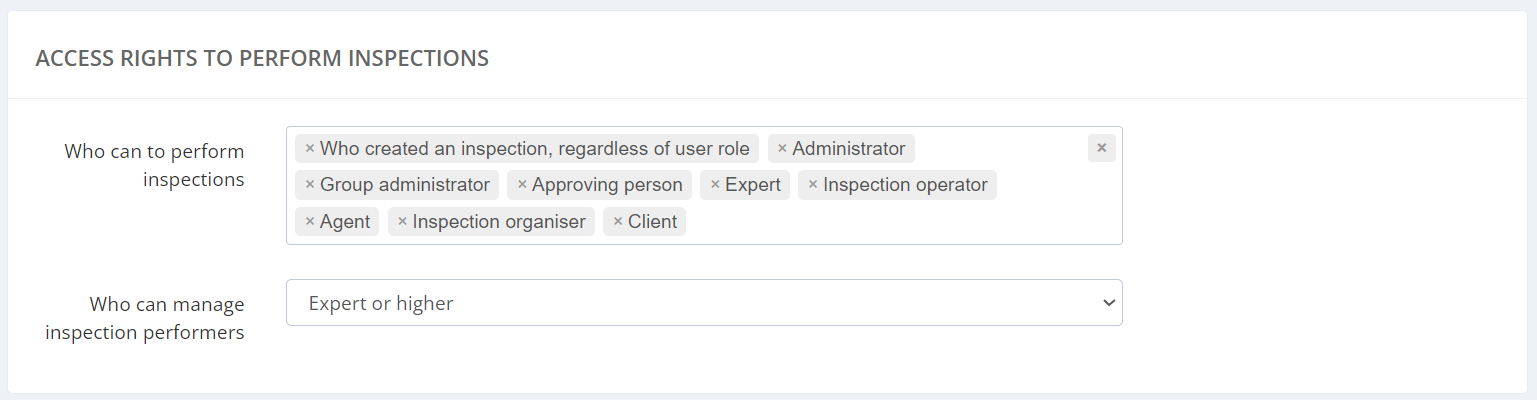
|
After the basic settings press "Save" button to save the Inspection Template.
|
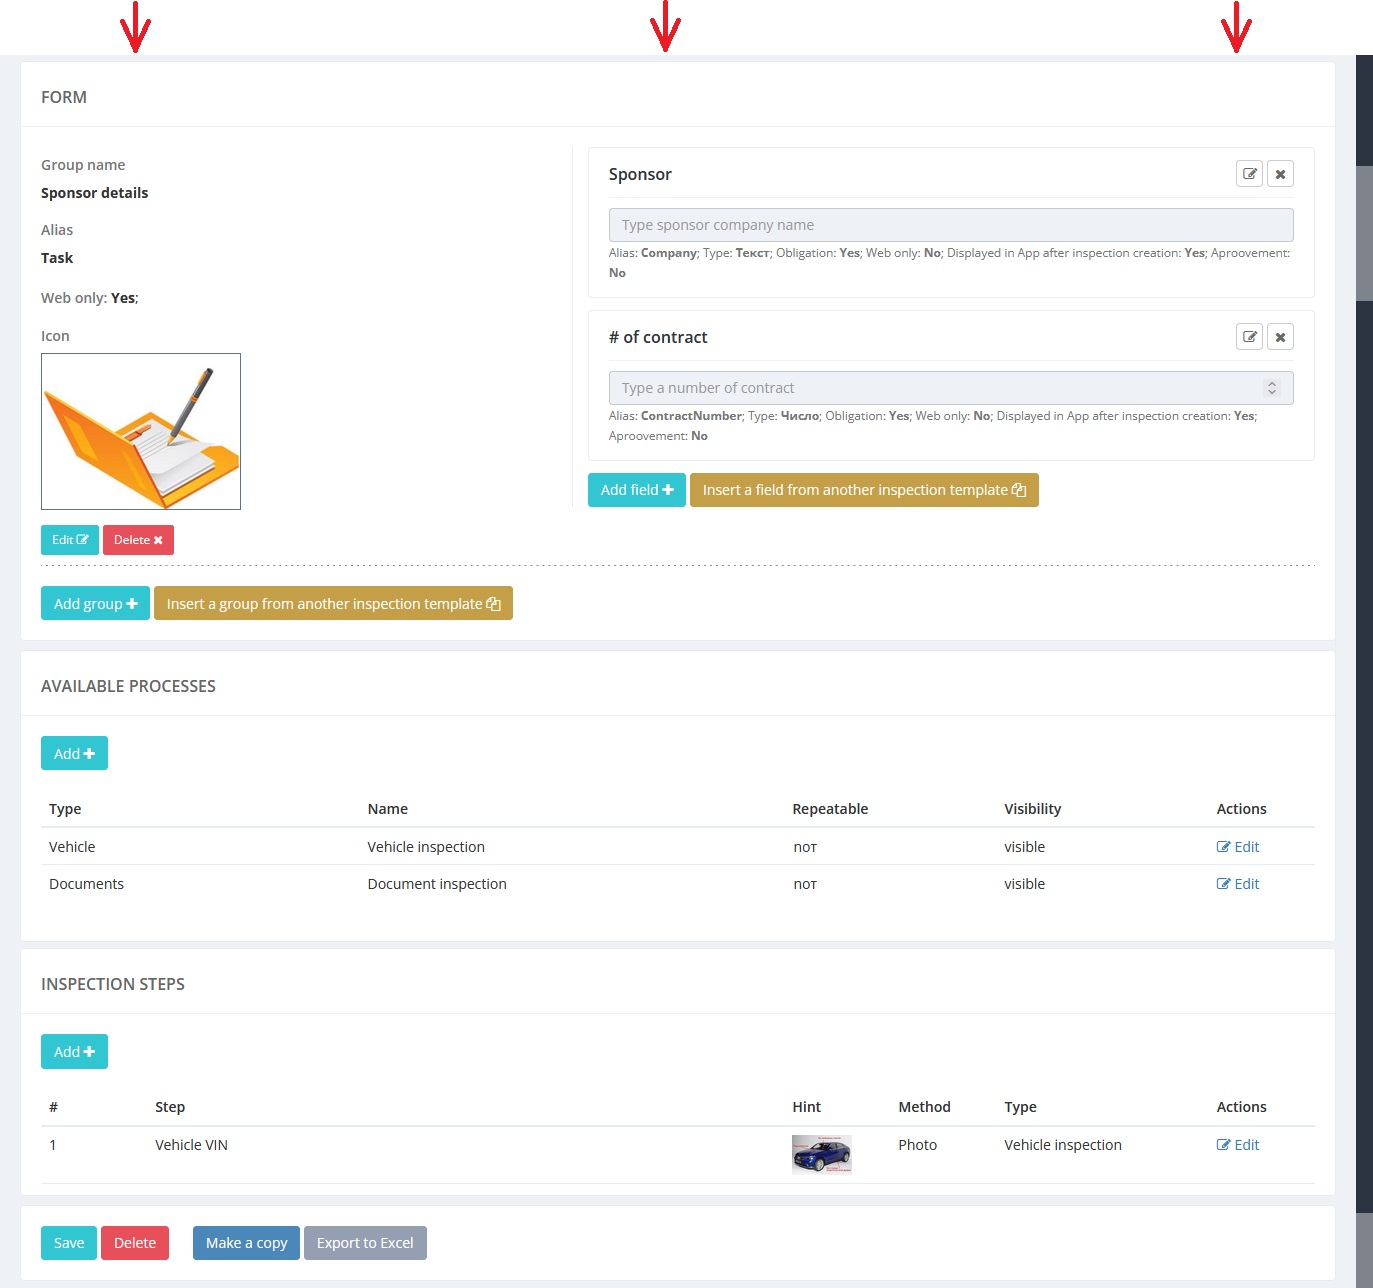
After you save the Inspection Template, you can create and configure the Editable forms, as well as the Processes and Steps of the Inspection Template. |
|
You can also "Make a copy" - to create a new template based on the current one, as well as to perform "Export to Excel" to work with the template in paper documents.